Quick start
Congratulations on your Digi WR64 purchase. The following steps guide you through the setup.
Step 1: What's in the box
When you open the WR64 package, look for the following:
- Welcome Card
- Digi WR64 device
- Digi WR64 label
Step 2: Gather accessories
Digi offers several WR64 accessory kits so you can purchase exactly what you need to support your WR64. See WR64 support for a list of accessory kits.
Here's the list of accessories used in this Quick start:
|
|
Antennas Use antennas provided by a Digi accessory kit or use alternate antennas that comply with the WR64 antenna requirements. |
|
|
Ethernet cable(s)
|
|
|
Phillips-head screwdriver Use a #1 Phillips-head screwdriver to remove and replace the SIM gasket cover when installing SIM cards. |
|
|
Power supply Use a power supply provided by a Digi accessory kit or use an alternate power supply that complies with the power supply requirements. |
|
|
Laptop or personal computer
Use an Ethernet cable to connect your WR64 to a laptop or PC. |
|
|
SIM card(s) If you intend to configure cellular at this time, acquire SIM cards as needed. Note the carrier, network APN (Access Point Name), and SIM pin (if any) for each card. |

|
Smart phone or tablet Optional: Use a smart phone or table to to automatically register your WR64 in your Digi Remote Manager account and connect to your cellular network. See Quick start using the Digi Remote Manager mobile app. |


Step 3: Connect
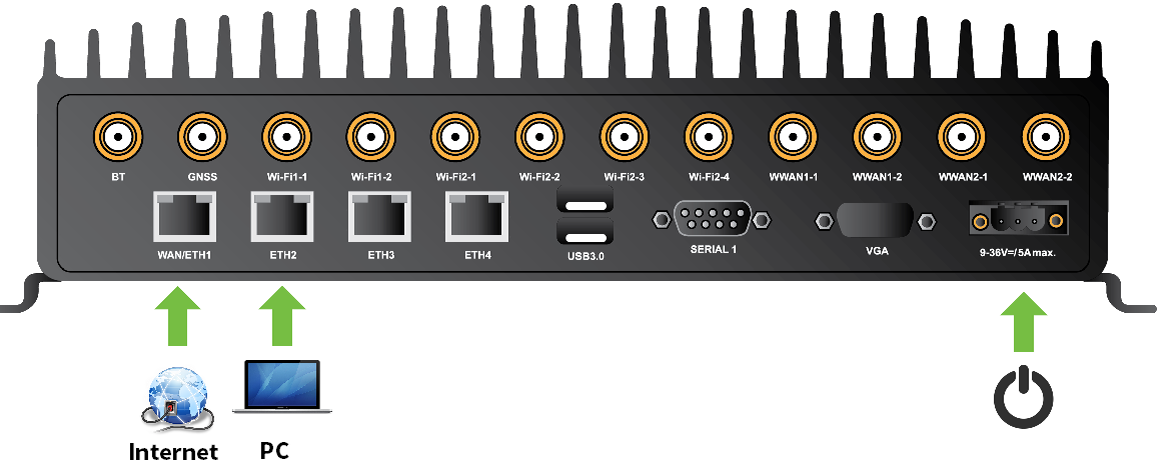
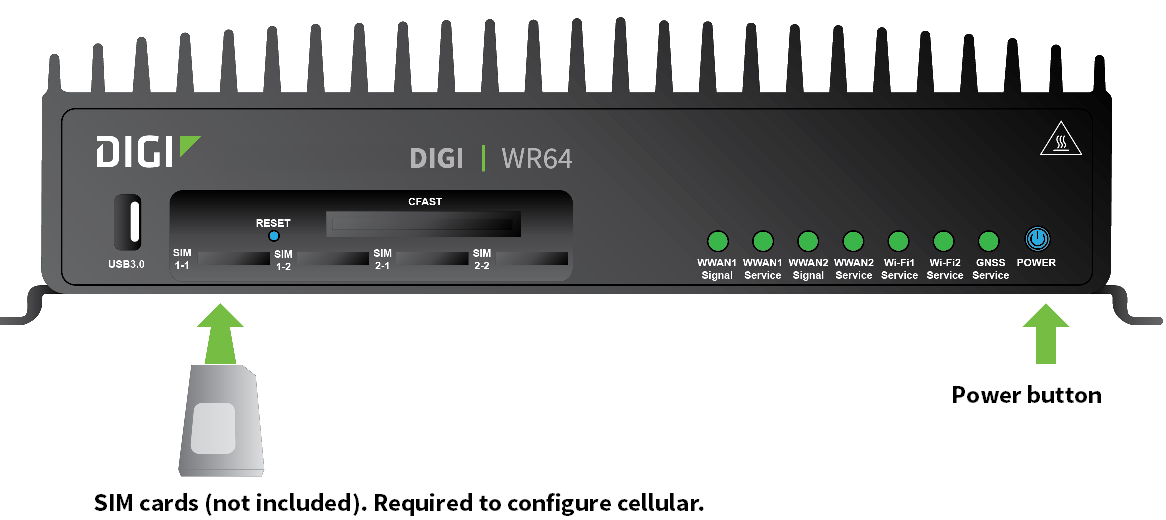
- If you intend to configure cellular at this time, Install SIM cards.
- Attach antenna(s).
- If you intend to configure Ethernet at this time, use an Ethernet cable to connect the WR64 WAN/ETH1 port to a hub with access to the Internet.
- Use an Ethernet cable to connect the WR64 ETH2 port to your PC.
Step 4: Power up
- Connect DC power.
Note If you need help understanding power requirements, see Digi WR64 power connector.
- Indicator LEDs blink to show status during startup.
- Wait for the power LED to stop blinking. The device is ready.
Step 5: Configure
- On the PC connected to the WR64, open a browser and go to 192.168.1.1.
- Log into the WR64:
User name: Use the default user name: admin
Password: Use the unique password printed on the bottom label of the device (or the printed label included in the package)
The WR64 Getting Started Wizard appears.
Next steps
After completing the Getting Started Wizard:
| |
To manage and configure your WR64 locally using the local web interface, see Digi WR Routers User Guide. |
| |
To manage and configure your WR64 remotely using Digi Remote Manager, see Digi Remote Manager User Guide. |
Quick start using the Digi Remote Manager mobile app
After connecting your hardware and powering up, you can use the Digi Remote Manager mobile app to quickly register your WR64 into your Digi Remote Manager account.
Here's how:
If you already have a Digi Remote Manager account:
- Download the Digi Remote Manager mobile app from the App Store (iPhone) or Google Play (Android).
- Click Log in or Sign Up and log in to your account.
- From the menu, select Install a device with a QR or bar code and scan the installation QR code on the label.
- Follow the prompts to complete your WR64 registration.
If you need to sign up for a Digi Remote Manager account:
- Click here to create a new account. You'll receive an email with login instructions.
- On your smartphone or tablet, download the Digi Remote Manager mobile app from the App Store (iPhone) or Google Play (Android).
- Open the Digi Remote Manager mobile app, click Log in and log into your new account.
- From the menu, select Install a device with a QR or bar code and scan the installation QR code on the label.
- Follow the prompts to complete your WR64 registration.
 PDF
PDF


